

Ensuring the optimal performance of any machine or vehicle is paramount for both safety and efficiency. One of the most critical aspects of this maintenance routine is performing a fluid check. Among various fluids, coolant plays a vital role in preventing overheating and ensuring that engines run smoothly. Regularly checking the levels and conditions of coolant can prevent unexpected breakdowns and costly repairs.
As part of a comprehensive fluid check checklist, it’s essential to inspect not only the coolant but also other vital fluids such as oil, brake fluid, and transmission fluid. Each of these fluids has specific requirements and functions, contributing to the overall health of your vehicle or machinery. By systematically checking each fluid, you can identify potential issues early and maintain safe running routines.
In this article, we will outline a detailed fluid check checklist that focuses on coolant and other essential fluids. Following this checklist will help you maintain a reliable and efficient operation, ensuring that your running routines are not only effective but also safe.
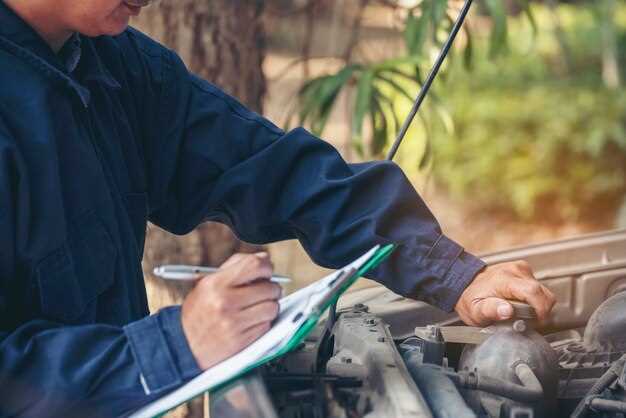
Step-by-Step Guide to Performing an Oil Check

Performing an oil check is essential for maintaining your vehicle’s health. Follow this guide to ensure proper oil levels and functionality.
Step 1: Prepare Your Vehicle
Before you begin, park your vehicle on a level surface and turn off the engine. Allow the engine to cool down for a few minutes to prevent burns and ensure accurate readings.
Step 2: Locate the Dipstick
Open the hood and locate the oil dipstick. The dipstick usually has a brightly colored handle, making it easy to find. Refer to your vehicle’s manual if you’re unsure.
Step 3: Remove the Dipstick
Grasp the dipstick by the handle and slowly pull it out of the tube. Be careful not to touch any hot components, as the engine may still be warm. Wipe the dipstick with a clean rag or paper towel to remove any oil.
Step 4: Check Oil Level
Reinsert the dipstick completely back into the tube and then remove it again to check the oil level. Look for the markings on the dipstick, which indicate the minimum and maximum oil levels. The oil should ideally be between these two marks.
Step 5: Assess Oil Condition
While checking the level, examine the oil’s condition as well. Fresh oil is typically brown or amber in color, whereas dirty oil may appear darker or have particles floating in it. If the oil looks gritty or has an unusual texture, it may be time for an oil change.
Step 6: Add Oil if Necessary
If the oil level is below the minimum mark, you need to add oil. Make sure to use the oil type recommended in your vehicle’s manual. Locate the oil filler cap, typically marked with an oil can symbol, and remove it. Pour in the necessary amount of oil slowly, checking the dipstick frequently to avoid overfilling.
Step 7: Final Check and Clean Up
Once the oil is at the correct level, reinsert the dipstick and close the hood securely. Dispose of any used rags properly, and check the coolant level as well to ensure your engine runs smoothly.
Regular oil checks are crucial for your vehicle’s performance and longevity. Following this step-by-step guide will help you maintain optimal oil levels, ensuring your vehicle remains in excellent condition.
Identifying Signs of Coolant Issues in Your Vehicle
Regular maintenance of your vehicle’s coolant system is essential for optimal engine performance. Detecting signs of coolant issues early can prevent severe damage and costly repairs. Here are key indicators to look for:
1. Overheating Engine: If your engine frequently overheats, it may signal a coolant leak or insufficient coolant levels. Monitor the temperature gauge on your dashboard for any unexpected spikes.
2. Coolant Leaks: Puddles of bright green, orange, or pink liquid under your vehicle could indicate a coolant leak. Inspect hoses and the radiator for signs of wear, cracks, or loose connections.
3. Low Coolant Levels: Regularly check the coolant reservoir. A consistent drop in coolant levels could point toward a leak or issues within the cooling system. Ensure that the coolant is at the recommended level.
4. Unusual Engine Noises: Gurgling or bubbling sounds from the engine may suggest air pockets in the cooling system or a failing water pump. These noises can affect engine performance significantly.
5. Temperature Warning Light: If the dashboard temperature warning light illuminates, it’s a clear signal that your engine is running hotter than normal. This could be due to coolant problems, and immediate attention is required.
6. Cloudy or Contaminated Coolant: If your coolant appears rusty, contaminated, or has an oily texture, it may be a sign of internal leaks or oil mixing with the coolant. This situation can lead to significant engine damage if not addressed promptly.
Paying attention to these signs can help ensure that your vehicle runs safely and efficiently. Promptly addressing coolant issues not only maintains engine health but also enhances the longevity of your vehicle.
Preventive Measures for Maintaining Optimal Fluid Levels
Maintaining optimal fluid levels is essential for the safe and efficient operation of any machinery or vehicle. One of the vital components to monitor is oil, which plays a critical role in lubrication and cooling. Regular checks should be part of your routine maintenance to prevent any issues that could arise from low fluid levels.
Begin by ensuring that your oil levels are checked frequently. This can be done by inspecting the oil dipstick, which provides a clear indication of the current fluid level. If the oil appears dirty or contaminated, it may be time for a change, ensuring the internals remain protected and functioning smoothly.
Additionally, make it a habit to inspect for any signs of leaks around the engine bay and under the vehicle. Addressing leaks promptly can prevent significant fluid loss and potential damage caused by insufficient oil levels. If you notice a decrease in fluid levels without an apparent leak, it may be indicative of internal engine issues that require further investigation.
Incorporating high-quality oil that meets manufacturer specifications is equally important. Using the appropriate oil ensures that it can withstand high temperatures and pressures, providing effective lubrication and protection. Furthermore, consider adhering to a consistent maintenance schedule, which includes regular oil changes and fluid top-offs, to ensure that the machinery operates at peak performance.
Lastly, educating yourself and your team about the importance of these checks can foster a culture of proactive maintenance. Implementing a checklist that includes oil checks can help streamline the process and ensure that fluid levels remain within optimal ranges for safe and efficient running routines.


